Instrument Gauge Factors
The Print industry uses measurement instruments to evaluate the print process, but how are the measurement devices themselves being assessed?
It is shocking to know most printers measure color output from multiple printing devices, without understanding the capabilities and characteristics of the measurement device performing the readings.
On the quest to build ChromaChecker, a Color Quality Conformance Platform for the Print Manufacturing Industry, the first tool required was Instrument Inspector. Used to assess the repeatability, reproducibility, and accuracy of a device, Instrument Inspector is able to benchmark an individual device, establish and assess the device’s baseline and compare the accuracy of one measurement instrument to another. Rarely is one measurement device used to take readings from different output technologies so it is critical to understand inherent differences between makes and models of spectrophotometers in order to accurately manufacture replicable color between the following output technologies:
- Proofers (print that is shown to the customer to set expectations), the typical instrument is the internal spectroproofer instrument built into Epson or HP proofing device
- Digital presses (short production), the typical instrument is an X-Rite i1Pro or an X-Rite ISIS
- Large-format inkjet printers (large size jobs such as signage), the typical instrument is an i1Pro Plus or a Barbieri LFP
- Conventional presses (traditional long-run production printing), the typical instrument is an X-Rite Intellitrax or Techkon
Each of these printing areas typically uses different instruments, and the goal is to make the final product from different printing devices “match” one another as closely as possible. With this goal in mind, it is critical to understand the disparity between varying instrumentation being used. It is important to note that the differences between measurement instruments could be even greater than the customer’s overall declared tolerance for the final product! Then what?!?
The first problem needing solving was, "What target, being meaningful to all measurement devices, would best be used to capture the measurement data from various devices?". "Meaningful" means the target must:
- capture a wide range of colors represented by the human eye
- support all measurement devices that a printer could use
- be durable and not wear out if handled or measured harshly
- be opaque to eliminate the need for the user to measure with an additional backing material
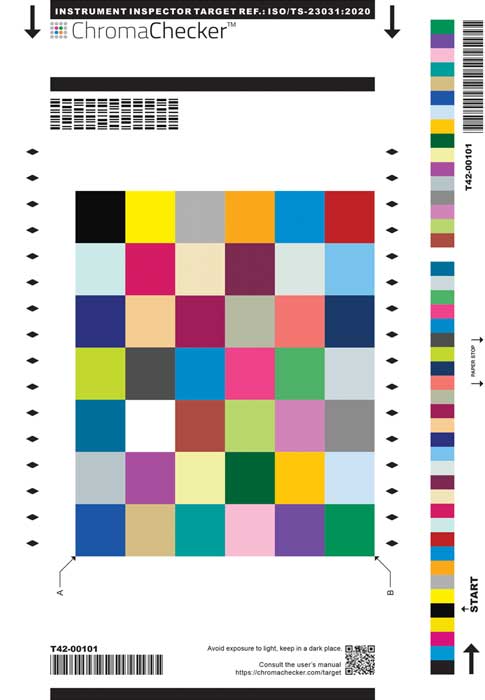 |
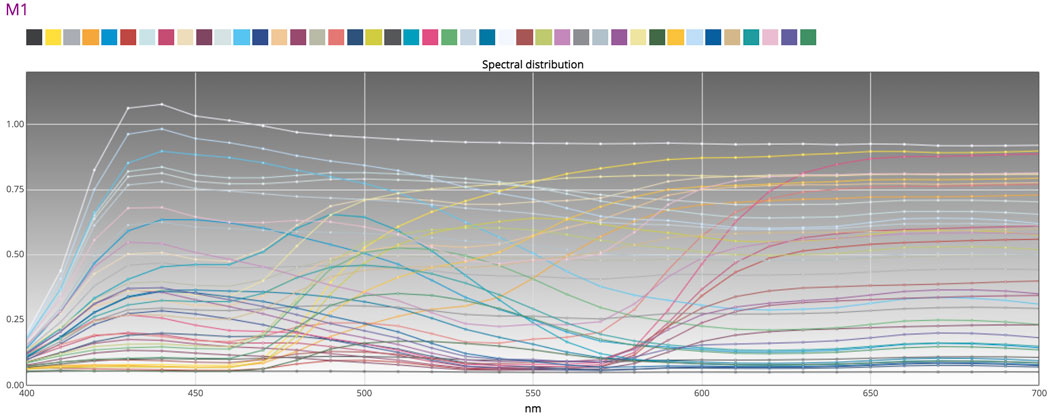 |
| T-42 Target | M1 Spectral curves of 42 patches |
|
Developed in 2016, ChromaChecker’s measurement instrument target (T42) is comprised of only 42 patches |
|
There is a fine line between capturing the spectra of the human visual range and creating a target, with so many patches, that it becomes counterproductive to measure in a production environment. The target is manufactured using a proprietary process to ensure it is 99.9% opaque, eliminating the need to measure it with additional backing material, and is made of a material incorporating optical brighteners, ensuring M1 compatibility. The T42 target will stand up to multiple measurements and will not fade or change color over time. This measurement device target project took two years and multiple trials before finding the optimal solution. The ChromaChecker Instrument Inspector T42 target is one of two targets referenced by ISO 23031(2020) “Assessment and Validation of the Performance of Spectrophotometers.” Both targets are supported by ChromaChecker Instrument Inspector. The second target is the BCRA Ceramic tiles which are not nearly as relevant to the graphic arts industry because printing is not done on ceramic. The BCRA tiles are good for 5+ years assessment of an instrument to its baseline.
Repeatability
Now, with a target that is relevant to the printing industry and supports most every measurement device used by printers, the process of measuring the target and assessing the data can take place. Measurement devices typically report what the repeatability is for the given device on a single white patch. This is not very informative in terms of how precise the measurement device is when measuring across the color range required to capture human vision.
When an instrument is connected to the ChromaChecker Capture software it is documented in terms of the serial number, make, model, and when provided, actual temperature values at the time of measurement. This information is then stored within the Instrument Inspector tool inside the ChromaChecker Cloud. It is recommended to measure the T42 target, with the measurement device, at least three times (more is better) to establish the measurement device's baseline. The baseline defines the repeatability of the measurement device by comparing the 42 different color patches measured each time. ChromaChecker calculates an average of the measurements making up the baseline, detailing each patch difference (∆L,∆C,∆H,∆E), and reporting a measurement comparison to the baseline using the following calculations:
- Peak ∆E
- 95th Percentile worst ∆E
- Average ∆E
The 95th Percentile CRF (Cumulative Relative Frequency) ∆E defines the precision of the instrument to itself and provides an excellent way to compare how precise each instrument is to itself when measuring spectra relative to human vision.
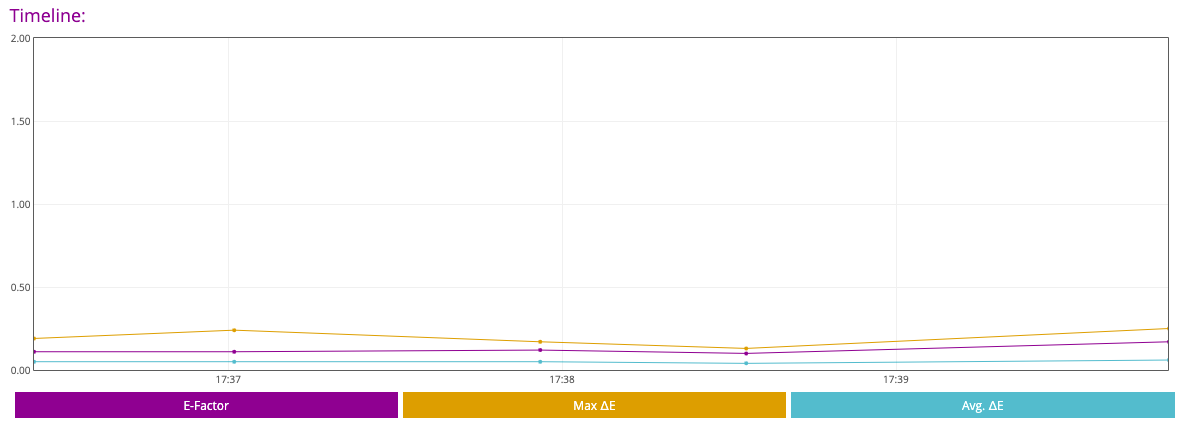
i1Pro1 Actual Data= same target measured over time
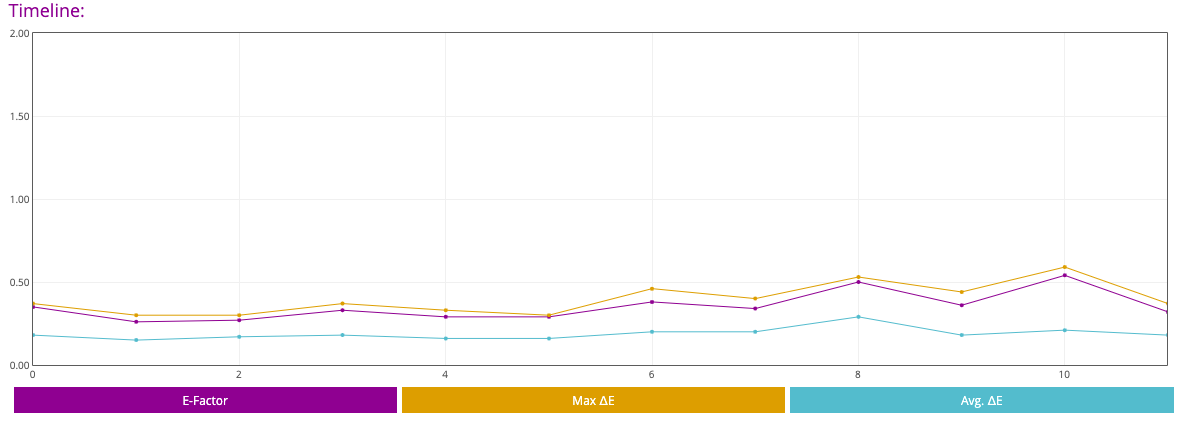
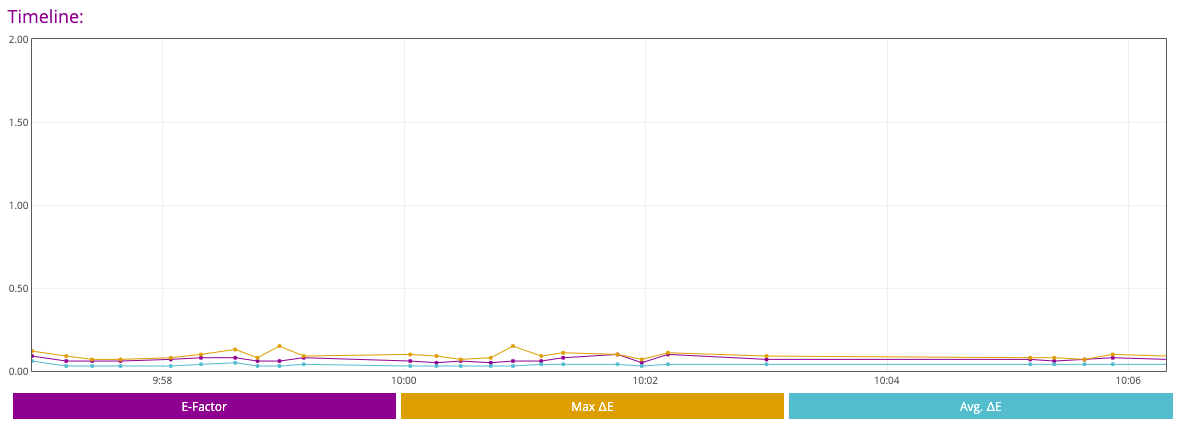
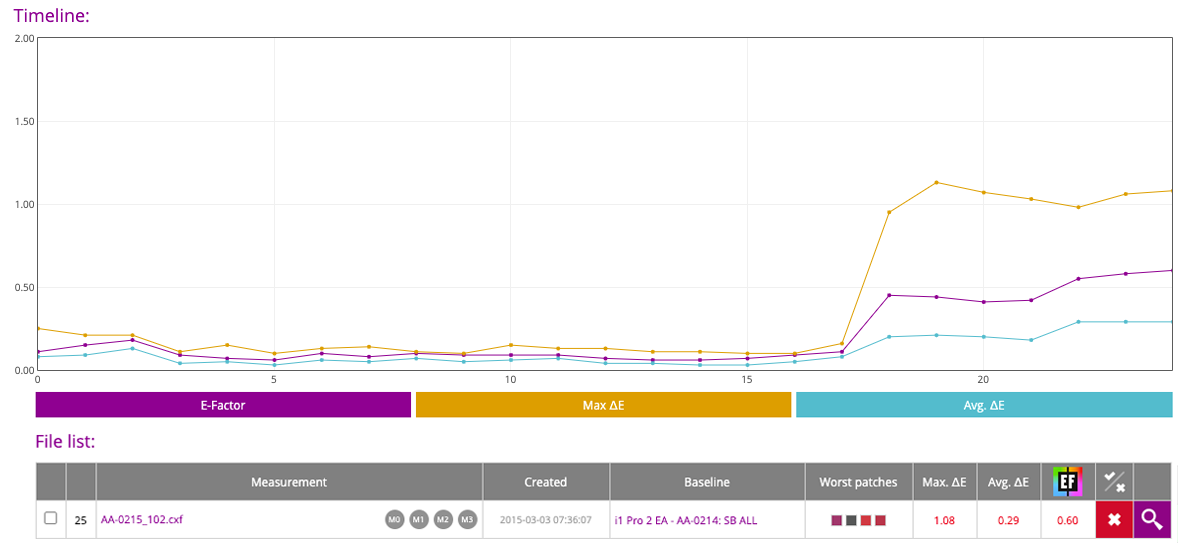
The higher the line graph is above the bottom of the graph, the less precise the measurement device is. Understand that this instrument was manufactured over 15 years ago, and technology has improved over time as seen by comparing the below graphs with the newer generations of the i1Pro (2 and 3). The last graph in the sequence shows the precision of an X-Rite eXact which is four times more expensive than an i1Pro.
i1Pro2
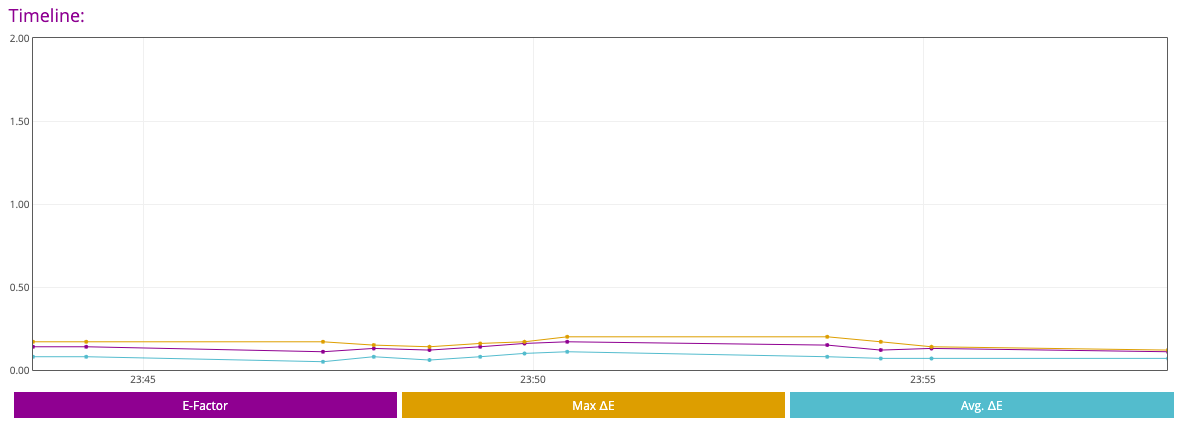
i1Pro3
X-Rite eXact
Reproducibility
Reproducibility relates to how much variability is introduced to the equation brought about by operator intervention and the automation of the measurement device itself. Automated measurement devices such as the X-Rite ISIS, i1iO, Barbieri LFP, and KonicaMinolta Myiro 9 have near-zero reproducibility errors because the target can only be measured one way. There is little to no way for the operator to influence the measurement values. Manual measurement devices such as the i1, Exact, Myiro, Nix, Spectro1, and SpectroDens all require human interaction to line the measurement head up with the patches and perform the measurement. The T42 target was created with large patches making it easier for operators to measure the target manually. There is also patch recognition algorithms designed to signal an error to the operator should a patch or patches be incorrectly measured.
Instrument Accuracy
There is no one standard/golden master measurement instrument in the Graphic Arts industry. So, the only comparison that can be made for accuracy is done between instruments and how they respond when measuring the same stimuli such as a target. In addition, instrument manufacturers implement different illuminants and calibrate to different base references which contributes to a substantial amount of instrument deviation between different manufacturers' instruments. This makes it even more important to understand the differences in how instruments measure color through the manufacturing chain and the impact the results have on customer expectations for a color "match". This is an additive process, something referred to as Delta E Stack, where the differences between multiple instruments, throughout the value chain, exacerbate the overall process deviation and significantly affect the resultant manufactured color. Think of the telephone game you played as a kid where one person starts with the original message (expected color) which is then conveyed to other people down the line (production process). In the end, the message or, in the case of printed materials the end product, is often very different from the original. Delta E Stack interjects undo pressure in replicating a customer's initial, expected color "match".
This is a comparison between how an i1, i1iO and an eXact measure the T42 target differently:
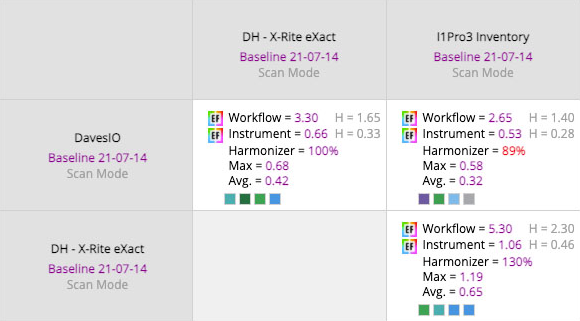
Notice the i1Pro3 instrument is the same as the i1 instrument in the IO measurement device, yet the color is different by an E-Factor of .53. The difference between the iO and the eXact is .66 E-Factor, and the difference between the i1 and eXact is 1.06 E-Factor; the workflow E-Factor= 5.3 represents the recommended minimum tolerance in the workflow to allow reasonable production tolerances.
Comparison of Measurement Error to Color Expectations
ChromaChecker is the first Color Quality Conformance Platform for the Print Manufacturing Industry that has the ability to quantify a customer’s color expectations (E-Factor) as they relate to a color "match". E-Factor is derived by means of a scientifically proven process using the CRF (Cumulative Relative Frequency) at 95th percentile delta E to assess what level of color match the customer/manufacturer is willing to accept (TAGA 2001, 2017, 2018). ChromaChecker allows a customer to define their IGF (Instrument Gauge Factor), and based on Six Sigma, it defaults to 20% allocating 20% of the workflow tolerance to be attributed to the instrument variation. If the instrument is assigned to a manufacturing process with a tolerance less than the instrument’s precision, the instrument will be flagged as failing accompanied by feedback stating the instrument precision is insufficient for the given workflow acceptance. Example, if the customers expectations for color match is 2 CRF at 95th percentile (E-Factor), and the instruments precision is greater than 20% of 2 = .4 CRF at 95th percentile, then the instrument will be flagged as not having acceptable precision.
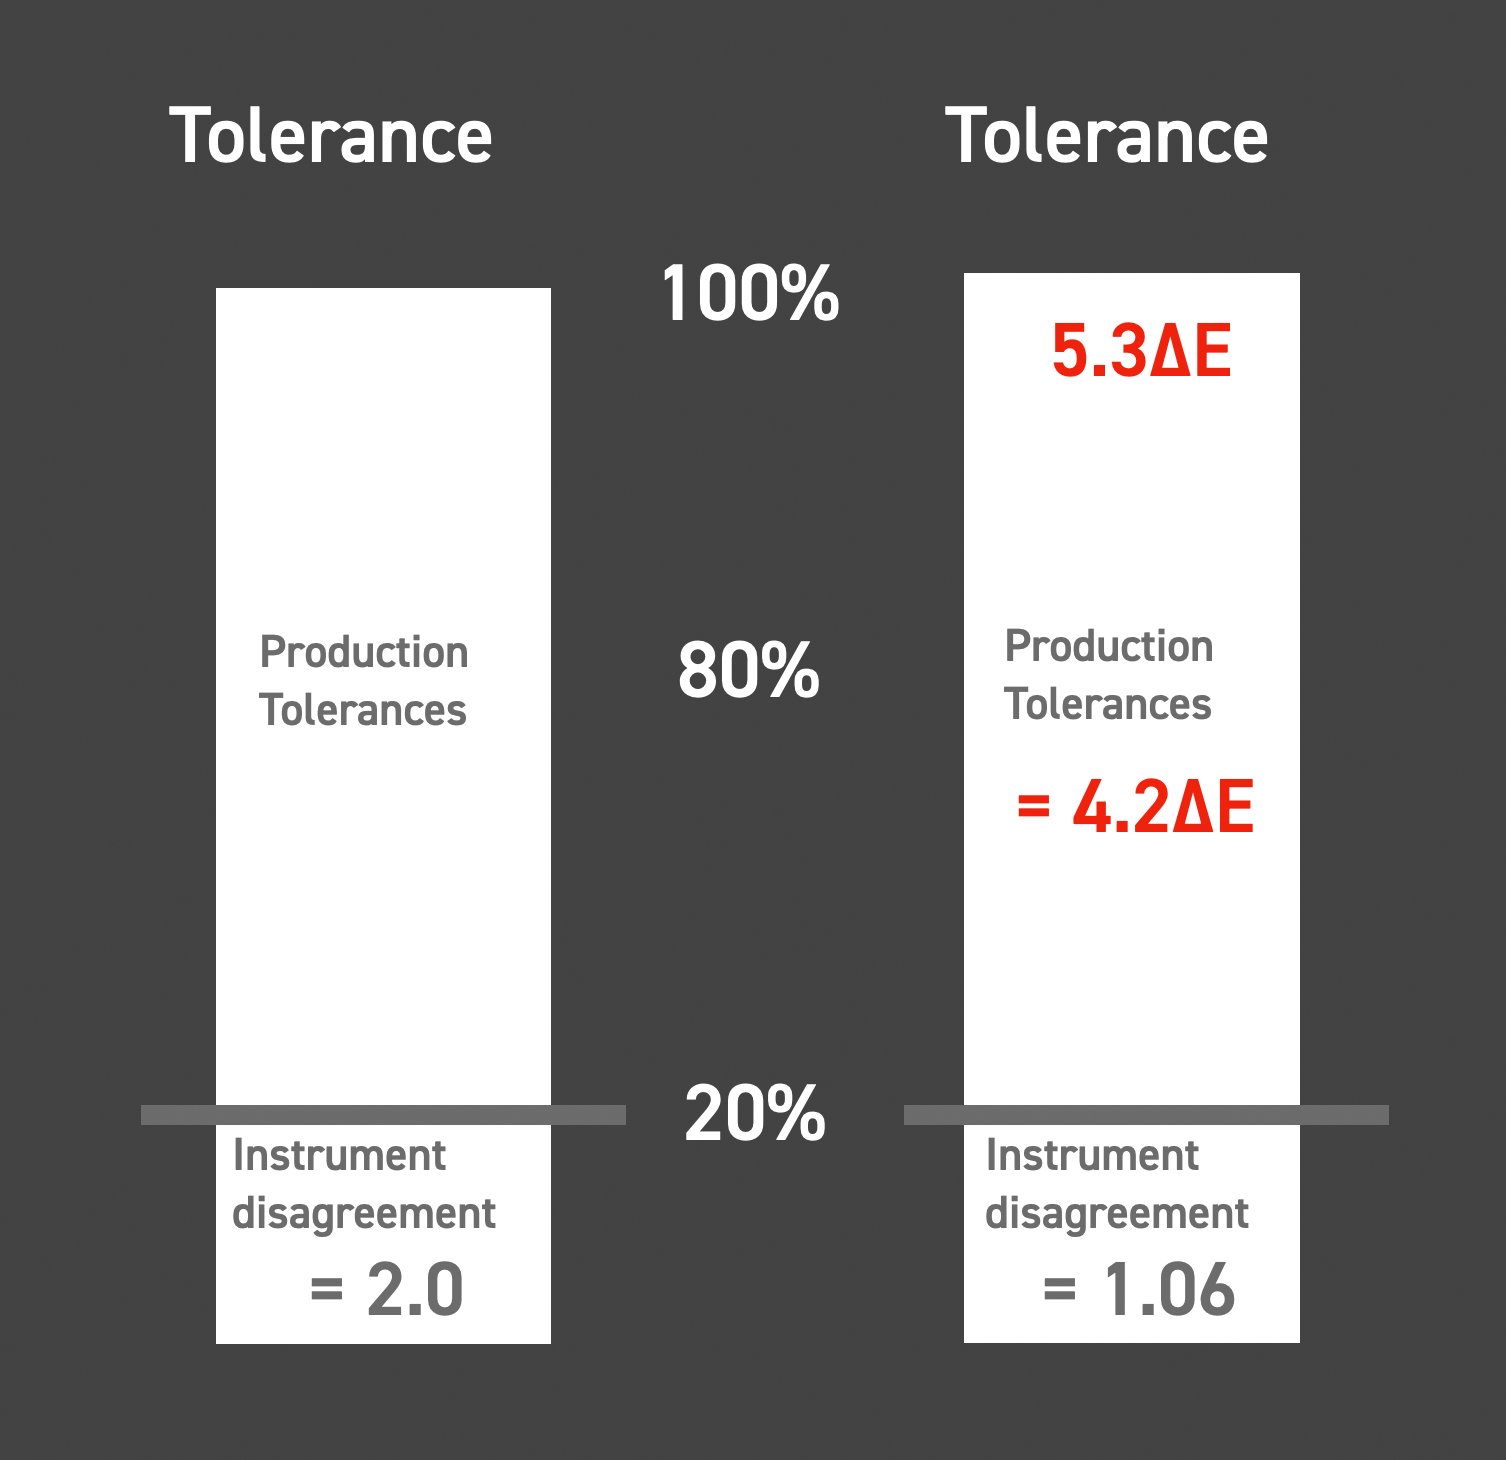
*Instrument Gauge Factor SIDEBAR
Every manufacturing industry that has components, created in different facilities that must fit together in the end, utilizes an Instrument Gauge Factor. The IGF is designed to accommodate the inherent differences in scientific measurement instruments used in the manufacturing process. No two scales, rulers, micrometers, color measurement devices, etc. weigh measure or read the same. ChromaChecker is the first company in the graphics industry to create an IGF which relates to the customer's color expectations and can be used to ensure multiple color measurement devices' Delta E Stack are all within established tolerances resulting in a manufactured end product that meets customers' color expectations and is salable.
Based on the Six Sigma Methodology (6σ) — ChromaChecker™ IGF allows a company to define what percentage of the workflow tolerance (20%, 25%, 33%) will be allocated to inter-instrument variation. As previously stated, no two instruments measure the same so ChromaChecker Instrument Inspector calculates instrument differences and assesses those differences' impact on the supply chain. Twenty percent (20%) provides the least amount of tolerance for instrumentation differences and leaves the most tolerance for the manufacturing process. Thirty-three (33%) provide the greatest amount of instrument variation, and the least left over for manufacturing. Following the baseline procedure of the instrument, ChromaChecker software defines the instrument E-Factor related to consistency to itself.
Comparing multiple Instruments to one another (Whether your measurement system is capable of distinguishing between different parts)
As stated above, each department in a print shop typically uses different measurement devices for different processes. ChromaChecker Instrument Inspector can assess all instruments to one another and use the Instrument Gauge Factor to calculate which instruments can be used for the same product based on the desired E-Factor for color match. If the instrument’s E-Factor exceeds the IGF then the instrument will be flagged as not appropriate to use in manufacturing a product to meet the customer's quantified expectations.
When Instruments are not “close enough” to one another (How ChromaChecker solves the problem for the color manufacturer)
It is understood that no two instruments measure color the same way so ChromaChecker has implemented unique capabilities to compensate for the inherent differences. If using automated instruments in production for process color matches, ChromaChecker supports the H100 target which is to be printed on each printing process and then measured by each measurement device required to report the process objective. Once ChromaChecker has the measurement data from the different measurement devices it can build an offset to accommodate the differences and eliminate up to 80% of the inherent differences which allows for 80% more variation in the production process because ChromaChecker is helping to zero out the differences due to the instrument devices themselves,
When working with manual measurement devices can single brand type colors, ChromaChecker allows for each instrument to measure the physical sample as the instrument's reference, and then tracks how each instrument (in any location in the world) measures future samples against the common reference which allows for different measurement devices to be used in different parts of the workflow and still have confidence that the end product will meet the customer's expectations.
Contact ChromaChecker Support
Additional information and Support Form is available for logged users.