Getting Started - Project Inspector Steps
Project Inspector is used to define components that make up a printed goal. This can be used for both Process Control and Color Matching. Print Inspector becomes the center for navigating between Print Inspector and Color Inspector so Projects can include Reference Targets, Color Assets, Substrate, and Tolerances set for production.
Once a project is defined, it can be deployed to production printers or shared with other ChromaChecker Accounts. The sharing of a Project is ideal for:
- Print Buyers who need to inform their Print Service Providers (PSPs) of printing goals.
- PSPs to deploy to a network of printing devices
- PSPs that outsource some of the printing with other PSPs
- PSPs that want to communicate with Manufacturers when evaluating new printing presses
- PSPs that want to communicate with Manufacturers for service troubleshooting
Steps for Production include:
- Select "Project Inspector" from the "Tools" menu
- Create a “Track Template”
- Add Project – Select “Track Template” from the pull-down.
- Deploy Project to Devices
- Any changes to the Project or Tracking template will update all tracks automatically.
Steps for Sharing a Project include:
- Select "Project Inspector" from the "Tools" menu
- Create a “Track Template”
- Invite your Print Service Provider
- Add Project – Select “Track Template” from the pull-down.
- Assign PSP to a Project
Adding a Tracking Template
- Go to tools/project inspector
- Select "Track Templates"
- Select "Add Track Template" for new template or Magnifier to Edit
![]()
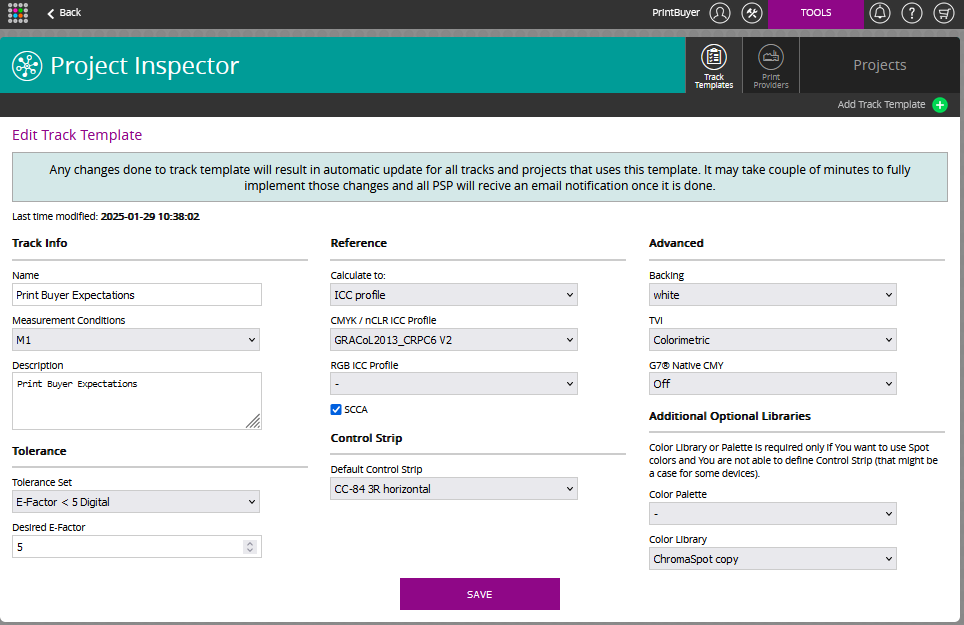
Define your specifications and tolerances. These are specifications that can be found in a requirements document or provided by your Print Service Provider that defines the print condition of the presses being used.
M Condition
Tolerance
Reference Target
SCCA
Minimum Control Strip
Advanced Options
Backing - White or Black
TVI - Colormetric or Densitometric
G7 Native DMT
In some print processes, CMY ink combinations often do not produce a balanced gray when profiles are not applied. The G7 Grayscale specification allows for this Native CMY option, which reduces the importance of the grayscale balance at the high-end. This is enabled by default in some workflows such as ONYX.
Adding a Project
- Go to tools/project inspector
- Select "Add Project" or Magnifier to Edit
- Name Project and "Add"
Related Topics
Contact ChromaChecker Support
Additional information and Support Form is available for logged users.