CC Sync Quick Start
A first-time tour of CC Sync - the desktop app that watches a folder and uploads your measurement files to ChromaChecker automatically.
Overview
CC Sync is a desktop app that watches a folder on your computer (or a network share) and automatically uploads matching measurement files to your ChromaChecker account - no manual upload step. You set up a task once, and it keeps your data flowing in the background.
CC Sync is the successor to CC Uploader. If you used CC Uploader, you can import your old tasks - see the step-by-step import guide.
Install & log in
Create a task (watch a folder)
Files upload automatically
Review results in the Dashboard
Before you begin
You need two things to get started:
- A ChromaChecker account.
- The CC Sync installer for Windows.
Logging in
The first time you launch CC Sync you'll accept the End User License Agreement (EULA), then you'll be asked whether to use secure storage to save your credentials for automatic login.
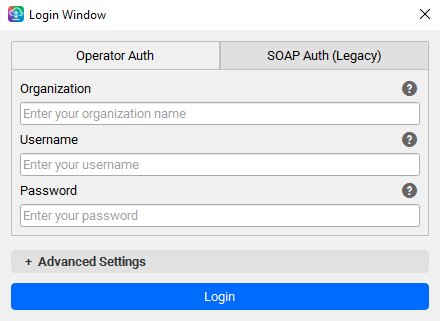
Next you'll see the Login window with two tabs. Pick a login method, fill in the fields, and click Login. On success, CC Sync briefly shows your subscription details and the window closes itself.
- Operator Auth (recommended) - enter your Organization, Username, and Password.
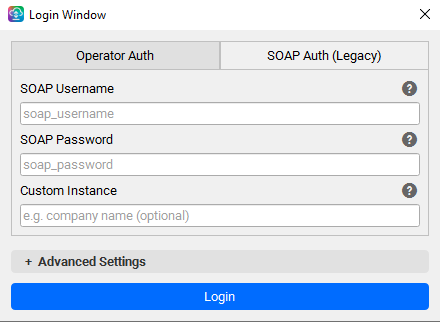
- SOAP Auth (Legacy) - enter your SOAP Username, SOAP Password, and an optional Custom Instance. SOAP credentials come from chromachecker.com/dashboard/en/soap.
If your network uses a proxy, expand + Advanced Settings to enter it.
 1
2
3
1
2
3
- 1 Choose your login method - Operator Auth (here) or SOAP Auth (Legacy).
- 2 Your ChromaChecker account: Organization, Username, Password.
- 3 Click Login - the window closes itself on success.
 1
2
1
2
- 1 Legacy SOAP credentials from chromachecker.com/dashboard/en/soap.
- 2 Custom Instance - optional, only for a custom ChromaChecker instance.
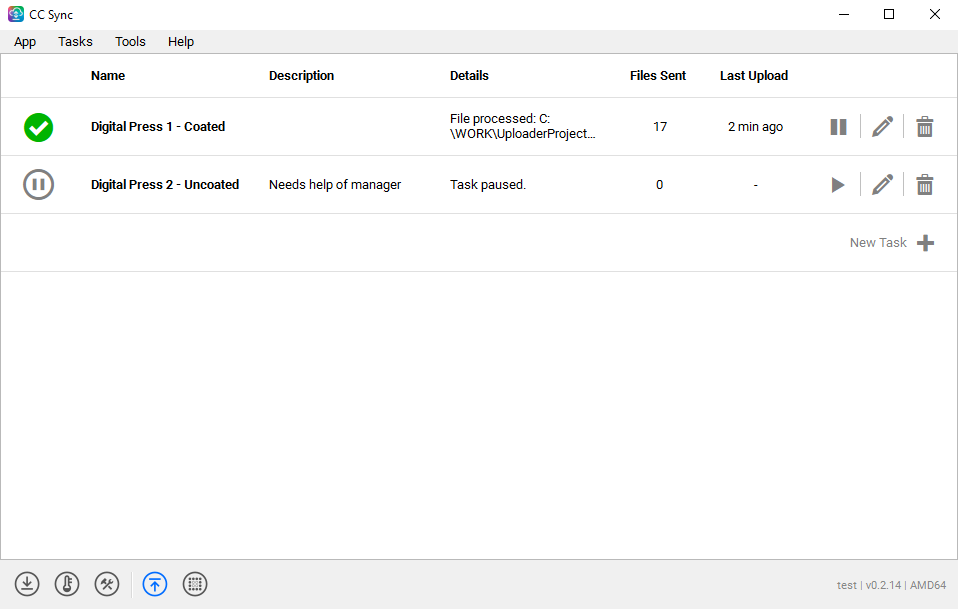
The Task Panel
After you log in, the Task Panel is your home window. It lists your tasks and gives you everything you need from the menu bar and the bottom toolbar.
 1
2
3
4
5
1
2
3
4
5
- 1 Menu bar - App, Tasks, Tools, Help (described below).
- 2 Status icon - running, paused, or needs attention.
- 3 Task Control - pause/resume, edit, or delete a task.
- 4 New Task button - create a task (opens the wizard).
- 5 Bottom toolbar - quick access to the Task List, Dashboard, Preferences, and Plugins.
The menu bar
- App - app-wide settings and your account, like opening Preferences or switching account (Change Account).
- Tasks - everything for managing tasks, like creating a New Task or importing/exporting your task list.
- Tools - actions added by plugins (for example, RHT Sensor when that plugin is installed).
- Help - support and info tools, like running Diagnostics or opening the Troubleshooting Guide.
Creating your first task
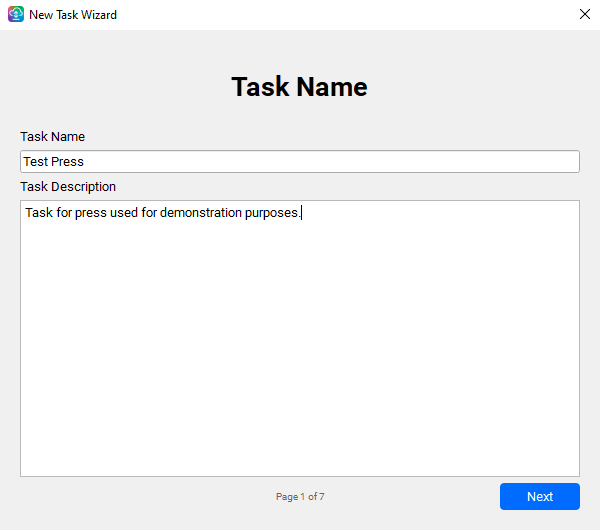
Click the New Task button (or Tasks → New Task…) to open the Task Wizard. It walks you through a few steps; each one is checked before you can continue.
Step 1 - Task Name
 1
2
1
2
- 1 A unique name - usually related to the press, device, or project this task is set up for.
- 2 An optional description for your own reference.
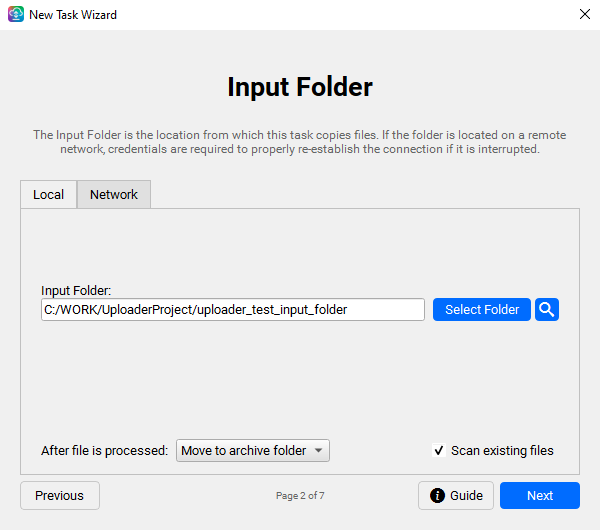
Step 2 - Input Folder
This is the folder CC Sync watches. Choose Local (a folder on this PC) or Network (a shared folder), and decide what happens to each file once it's been uploaded.
 1
2
3
4
1
2
3
4
- 1 Local / Network tabs.
- 2 Pick the folder to watch (the magnifier opens it to check).
- 3 After file is processed - move or copy it to the Archive folder, or delete it.
- 4 Scan existing files - also process files already in the folder.
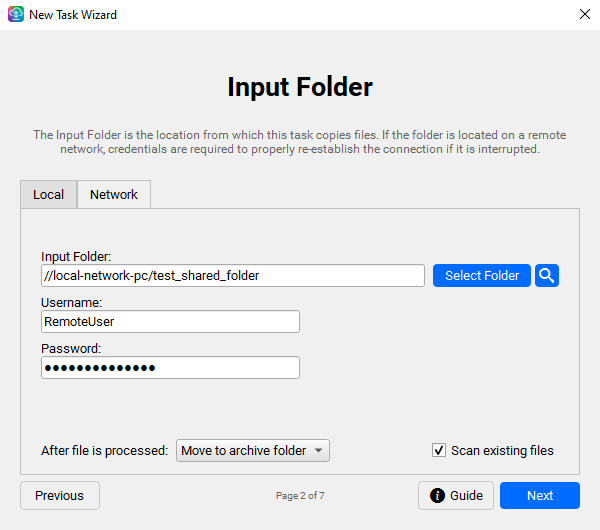 1
2
1
2
- 1 The network folder path (UNC).
- 2 Username and Password for the share.
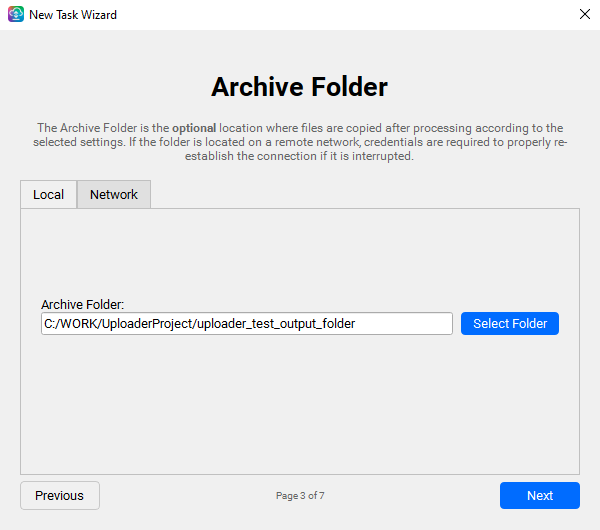
Step 3 - Archive Folder
The Archive Folder is where processed files are moved or copied. This page works just like the Input Folder page - the same Local / Network tabs and folder picker - so it'll feel familiar. It only appears if you chose to move or copy files on the previous step; if you chose to delete them, the wizard skips it. When it does appear, the folder is required.
Step 4 - File Recognition
Not every file in a folder is relevant to every task. File Recognition makes sure CC Sync only picks up the ones you mean - by file type, and optionally by filename.
 1
2
3
1
2
3
- 1 Accepted file extensions - match your instrument's output.
- 2 Other - type a custom extension if yours isn't listed.
- 3 Accept file names - narrow further by filename (all / contains text / regex).
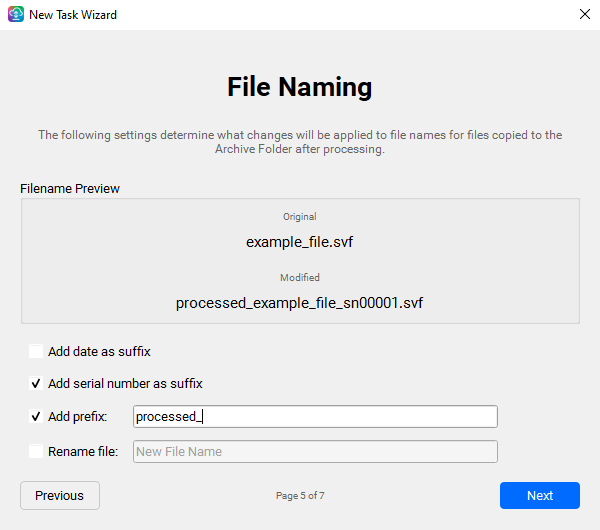
Step 5 - File Naming
Renaming files on the way out keeps your uploads organized and traceable. These options are optional, and the live preview shows exactly how each file will be named.
 1
2
1
2
- 1 A live filename preview (original → modified) updates as you change the options.
- 2 Add a date or serial number suffix, a prefix, or fully rename the file.
Step 6 - Destination
Finally, tell CC Sync where the data should land on ChromaChecker by picking the tab that matches your setup: Auto Recognition lets the server route the file by its contents; Specific Track sends it to a device and track you've already set up; Project routes it by buyer → project → device; and Color Library imports color files (CxF/MxF/QTX) into a named library. Detailed setup of these lives in the ChromaChecker docs - for the quick start, just pick what matches your workflow.
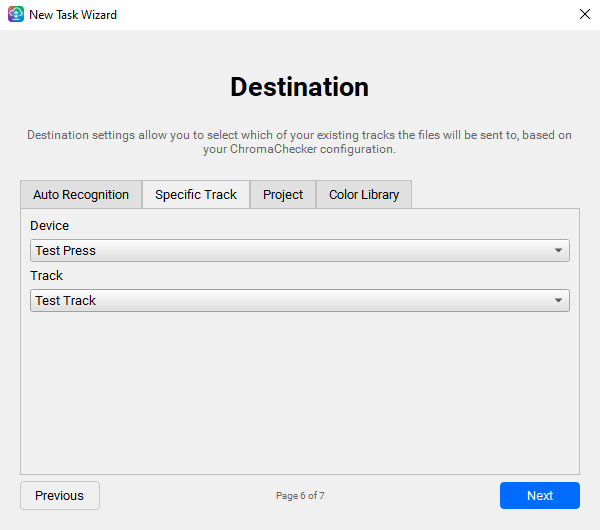 1
2
1
2
- 1 The destination tabs - choose how files are routed.
- 2 For Specific Track: pick the device and its track.
Step 7 - Task summary
The final page summarizes every choice you made. Review it - and if something needs changing, click any group box to jump straight back into quick-edit for that step. When everything looks right, click Create Task; it's added to your list and starts watching right away.

Managing your tasks
Back on the Task Panel, you manage tasks day to day:
- Pause / resume, edit, or delete a task from its row (or double-click a row to open it).
- Import… / Export… (Tasks menu) to back up your task setups or move them to another machine.
- Import Legacy Tasks… to bring over your tasks from CC Uploader - covered step by step in the import guide.
1
2
3
- 1 Pause / resume a task without removing it.
- 2 Edit a task (or double-click its row to open it).
- 3 Delete a task you no longer need.
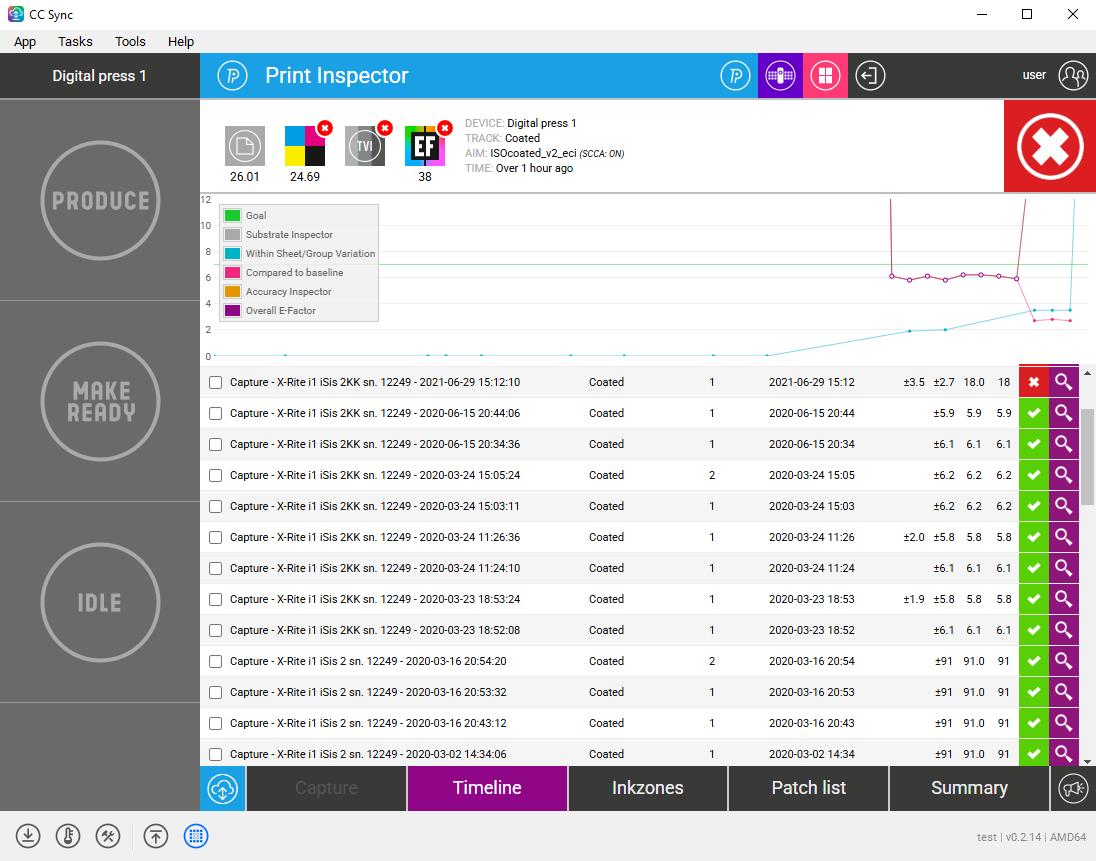
The CC Dashboard
CC Sync has the ChromaChecker dashboard built in. Switch to the WebViewer from the bottom toolbar to open the CC Dashboard. It signs you in automatically, so you can review the data your tasks uploaded without opening a browser.
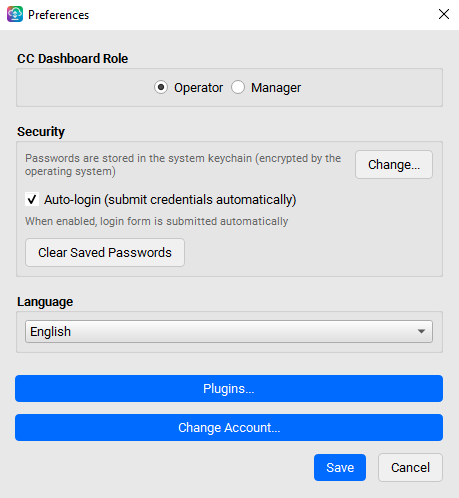
Preferences
Open Preferences from the App menu (or the crossed hammer-and-wrench icon on the toolbar) to adjust how CC Sync behaves.
 1
2
3
4
1
2
3
4
- 1 CC Dashboard Role - which role the built-in Dashboard signs in as. Only shown when it applies to your account (for example, manager-capable accounts).
- 2 Security - passwords stored in the OS keychain; toggle auto-login or clear saved passwords.
- 3 Language - change the interface language anytime.
- 4 Plugins… / Change Account… - open the Plugin Manager, or switch accounts.
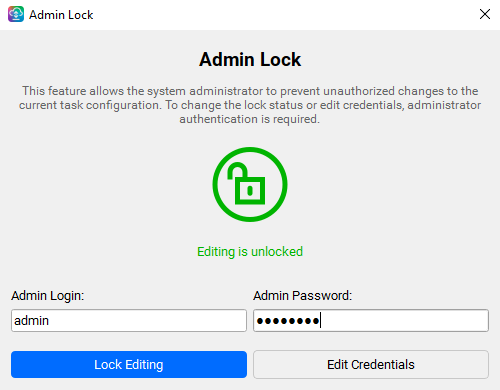
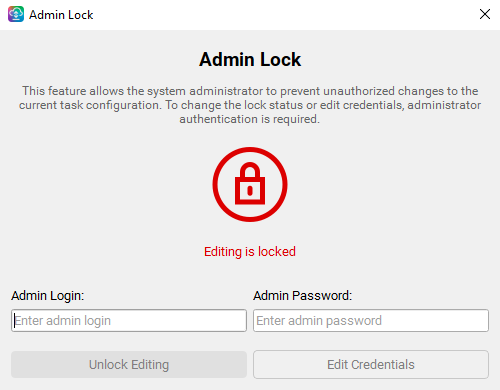
Admin Lock
Admin Lock (Tasks → Admin Lock) lets an administrator lock task editing so operators can't add, edit, or remove tasks. The first time you open it, if no admin credentials exist yet, CC Sync asks whether you'd like to set them up - choose Yes to create an admin login and password, and the Admin Lock window opens. After that, changing the lock requires that admin login and password, and the state persists across restarts.
 1
2
3
1
2
3
- 1 Green padlock - editing is unlocked (default).
- 2 Enter the admin login and password.
- 3 Press Lock Editing to protect the configuration.
 1
2
3
1
2
3
- 1 Red padlock - editing is locked; operators can't change tasks.
- 2 Enter the admin login and password.
- 3 Then press Unlock Editing - the lock state only changes once you click the button.
To change the admin login or password, enter the current admin credentials, then use Edit Credentials.
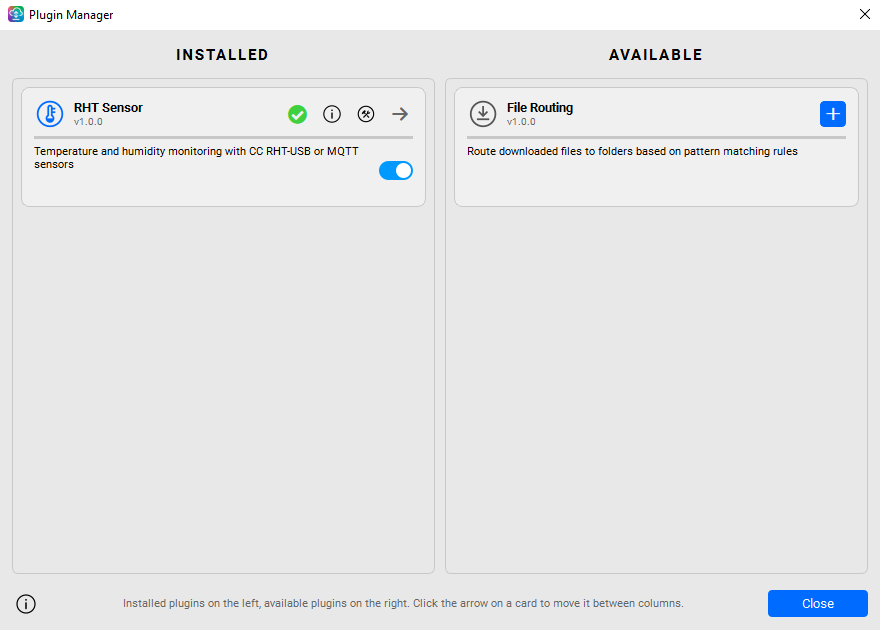
CC Plugins
Plugins add optional features. Open the Plugin Manager from App → Plugins… (or Preferences → Plugins). Plugins on the left are Installed; plugins on the right are Available - the column a plugin is in is its state.
 1
2
3
4
1
2
3
4
- 1 Installed - your active plugins (here, RHT Sensor).
- 2 The Enabled toggle turns a plugin's feature on or off without uninstalling. Each card also has Docs and Setup buttons and an arrow to uninstall.
- 3 Available - plugins you can add (here, File Routing).
- 4 Click + to install - it activates and opens its Setup.
Running in the background
CC Sync is built to keep running quietly. Clicking the window's X minimizes it to the system tray - it does not quit, and your tasks keep uploading. Look for the CC Sync icon in the tray (its tooltip reads “ChromaChecker Sync”); right-click it for Show (reopen the window) and Exit (fully quit).
To keep your data flowing, leave CC Sync running in the tray. Use Exit only when you really want uploads to stop - it confirms, stops your tasks, and closes the app.
Getting help
CC Sync has support tools built in, under the Help menu:
- Run Diagnostics… - checks your environment and connection and produces a copyable report.
- Troubleshooting Guide… - a built-in FAQ for common issues.
- Report a Bug… / Request a Feature… / Report a Translation Issue… - send feedback from inside the app. A bug report can even be pre-filled for you after a crash.
Next steps
That's the tour. Your task is running - drop measurement files into the watched folder and watch the Files Sent count climb, then open the CC Dashboard to see the results in ChromaChecker.
- Automate more of your workflow → Automation Opportunities
- Connect ChromaChecker to other systems → Third-Party Integrations
- Everything else → Support hub